
ഓല ചുമ്മാ കത്തിച്ചു കളയല്ലേ! പഴയ സിമന്റ് ചാക്കിൽ ഒരു പിടി ഓല മതി ഇനി ചേമ്പ് പറിച്ച് മടുക്കും; ഒരു ചാക്കിന്ന് അഞ്ച് കിലോ ചേമ്പ് പറിക്കാം!! | Easy Chembu (Colocasia/Taro) Cultivation Using Thengola (Coconut Husk)
Easy Chemb Cultivation Using Thengola : പണ്ടുകാലങ്ങളിൽ നമ്മുടെയെല്ലാം വീടുകളിൽ നാടൻ വിഭവങ്ങൾ തിരഞ്ഞെടുത്തിരുന്നത് വീട്ടിൽ തന്നെ ലഭിച്ചിരുന്ന ചേമ്പാണ്. ധാരാളം മണ്ണും തൊടിയുമെല്ലാം ഉള്ളവർക്ക് വീട്ടാവശ്യത്തിനുള്ള ചേമ്പ് വളരെ എളുപ്പത്തിൽ തൊടിയിൽ തന്നെ വളർത്തിയെടുക്കാനായി സാധിക്കും. എന്നാൽ ഇന്നത്തെ കാലത്ത് ഫ്ലാറ്റിലെല്ലാം താമസിക്കുന്നവർക്ക് ഇത്തരത്തിൽ ചേമ്പ് കൃഷി ചെയ്ത് എടുക്കാൻ സാധിക്കണമെന്നില്ല.
Selecting the Right Taro (Chembu) Variety ✅
- Choose healthy, firm taro corms with visible sprouts.
- Varieties like Mukhikachil, Thalikol Chembu, and Eddoe are great for home gardening.
2. Preparing the Planting Area 🏡
- Select a partially shaded area with well-draining soil.
- If planting in pots, use large grow bags or drums with drainage holes.
3. Using Thengola (Coconut Husk) for Planting 🥥
- Step 1: Soak coconut husks (thengola) in water overnight for better moisture retention.
- Step 2: Place the husks at the bottom of the planting hole or inside the pot to improve drainage.
- Step 3: Fill with a mix of garden soil + compost + sand for a loose, well-aerated medium.
4. Planting the Taro (Chembu) 🌱
- Place the chembu corm 2–3 inches deep, sprout side up.
- Maintain 1.5–2 feet spacing between each plant.
5. Watering & Care 💧
- Keep the soil moist but not soggy—water every 2-3 days.
- Mulch with dried leaves or coconut husks to retain moisture.
6. Natural Fertilization 🌿
- Apply cow dung, compost, or wood ash every 20 days for better growth.
- Use banana peels or neem cake powder for extra nutrients.
7. Pest & Disease Control 🐛
- Spray neem oil or buttermilk solution to prevent fungal infections.
- Use wood ash to keep away ants and aphids.
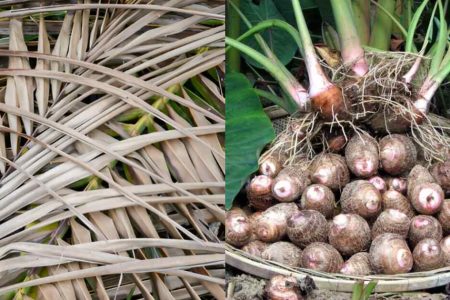
8. Harvesting Taro (Chembu) 🥔
- Ready to harvest in 5–7 months when leaves start turning yellow and dry.
- Carefully dig up the corms and let them dry for a day before storage.
അത്തരം അവസരങ്ങളിൽ ഒരു ചാക്ക് ഉപയോഗപ്പെടുത്തി എങ്ങനെ ചേമ്പ് കൃഷി ചെയ്യാനായി സാധിക്കുമെന്ന് വിശദമായി മനസ്സിലാക്കാം. ഈയൊരു രീതിയിൽ ചേമ്പ് നട്ടുപിടിപ്പിക്കാനായി അത്യാവശ്യം വട്ടമുള്ള ഒരു സിമന്റിന്റെ ചാക്ക് എടുക്കുക. അതിന്റെ അടിവശത്തുള്ള പൊടിയെല്ലാം നല്ലതുപോലെ തട്ടിക്കളയാനായി പ്രത്യേകം ശ്രദ്ധിക്കണം. ശേഷം ചാക്കിൽ മണ്ണ് നിറയ്ക്കുമ്പോൾ ഉണ്ടാകുന്ന കനം കുറയ്ക്കാനായി ഏറ്റവും താഴത്തെ ലയറിൽ കുറച്ച് കരിയില അല്ലെങ്കിൽ ഉണങ്ങിയ ഓല ലഭിക്കുമെങ്കിൽ അത് ഫിൽ ചെയ്തു കൊടുക്കുക.
ശേഷം മുകളിലായി ഒരു ലയർ ചാണകപ്പൊടി അല്ലെങ്കിൽ ചാരപ്പൊടി വിതറി കൊടുക്കുക. അതിനു മുകളിലേക്ക് കുറച്ച് പുളിപ്പിച്ച കഞ്ഞിവെള്ളം കൂടി തളിച്ച് കൊടുക്കാവുന്നതാണ്. ഈ ഒരു ലയറിന് മുകളിലായി ജൈവ വളക്കൂട്ട് ചേർത്തുണ്ടാക്കിയ മണ്ണ് പോട്ടിങ് മിക്സായി ഫിൽ ചെയ്തു കൊടുക്കാം. അതിനുമുകളിൽ പുളിപ്പിച്ച കഞ്ഞിവെള്ളം ഒരുതവണ കൂടി സ്പ്രേ ചെയ്തു കൊടുക്കുക. വീണ്ടും നേരത്തെ ചെയ്തത് പോലെ ഉണങ്ങിയ കരിയിലകൾ അല്ലെങ്കിൽ ഓല ചാക്കിൽ നിറച്ചു കൊടുക്കുക. മുകളിൽ കുറച്ച് മണ്ണ് കൂടി ഇട്ട് നല്ലതുപോലെ സെറ്റ് ചെയ്ത് എടുക്കണം.
ശേഷം ചേമ്പ് നടാനാവശ്യമായ മണ്ണിന്റെ മുകളിൽ നല്ല രീതിയിൽ വെള്ളം ഒഴിച്ചു കൊടുക്കുക. മുളപ്പിച്ചെടുത്ത ചേമ്പ് മണ്ണിൽ നട്ട് പിടിപ്പിച്ച് കൊടുക്കാവുന്നതാണ്. ഇടയ്ക്കിടയ്ക്ക് ചെടിക്ക് ആവശ്യമായ വെള്ളം ഒരു സ്പ്രേ ബോട്ടിലിൽ ആക്കി സ്പ്രേ ചെയ്ത് കൊടുക്കണം. ഈയൊരു രീതിയിൽ ചേമ്പ് നട്ട് പിടിപ്പിക്കുകയാണെങ്കിൽ വളരെ എളുപ്പത്തിൽ വളർത്തിയെടുക്കാൻ സാധിക്കുകയും അതേസമയം തന്നെ ചാക്കിന്റെ കനം കുറയ്ക്കാനും സാധിക്കും. വിശദമായി മനസ്സിലാക്കാൻ വീഡിയോ കാണാവുന്നതാണ്.