
ഒരു ചെറിയ പപ്പായ തണ്ടിൽ നിന്നും കിലോ കണക്കിന് പപ്പായ പൊട്ടിക്കാൻ കിടിലൻ സൂത്രം! ഈ ഒരു സൂത്രം ചെയ്താൽ മതി എല്ലാ പപ്പായയും കയ്യെത്തി പറിക്കാം!! | Papaya Air Layering Tips – Easy Propagation Method
Papaya Air Layering Tips : പപ്പായ ചുവട്ടിൽ നിറയെ കായ്ക്കാൻ ഒരു അടിപൊളി സൂത്രപ്പണി! ഇനി ചുവട്ടിൽ നിന്നും പപ്പായ പൊട്ടിച്ചു മടുക്കും! ഈ ഒരു സൂത്രം അറിഞ്ഞാൽ പപ്പായ എല്ലാം കൈ എത്തി പറിക്കാം! പപ്പായ ചുവട്ടിൽ നിന്നും കുലകുത്തി കായ്ക്കാൻ ഒരു കിടിലൻ വഴി. നമ്മുടെ നാട്ടിൽ സ്ഥിരമായി കാണുന്ന ഒന്നാണ് പപ്പായ, അല്ലെങ്കിൽ കപ്പളങ്ങ പപ്പരയ്ക്ക എന്നിങ്ങനെ വിവിധ പേരുകളിൽ അറിയപ്പെടുന്ന ഓമയ്ക്ക.Benefits of Air Layering for Papaya
✔️ Faster Growth – Grows quicker than seeds.
✔️ Early Fruiting – Bears fruits within 6-8 months.
✔️ Disease-Free Plants – Stronger and healthier than seedlings.
✔️ No Need for Seeds – Clone the best papaya plant you already have!
2️⃣ How to Air Layer Papaya – Step-by-Step Guide
🔸 Materials Needed
✔️ A healthy papaya branch (1 cm thick, 12-15 inches long)
✔️ Sharp knife/blade
✔️ Coconut husk or sphagnum moss
✔️ Rooting hormone (optional)
✔️ Plastic wrap or cloth
✔️ String or rubber band
🔸 Step 1: Selecting the Right Branch
✅ Choose a strong, disease-free branch that is not too young or too old.
✅ Make sure the branch has some leaves but is not too leafy.
🔸 Step 2: Making the Cut
🔹 Use a sharp knife to make a circular cut around the branch.
🔹 Remove a 1-inch bark ring to expose the inner wood.
🔹 Apply rooting hormone (optional) to speed up root formation.
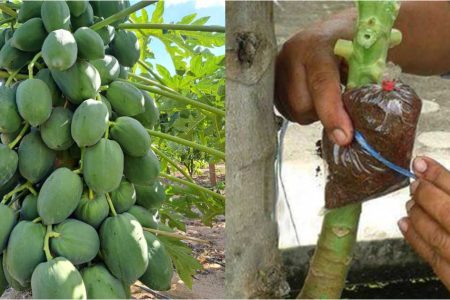
🔸 Step 3: Covering with Moist Medium
🔹 Take wet coconut husk or sphagnum moss and cover the cut area.
🔹 Wrap with plastic or a cloth to hold moisture.
🔹 Tie both ends securely with string or a rubber band.
🔸 Step 4: Wait for Root Growth
✅ Keep the wrapping moist by spraying water every few days.
✅ In 4-6 weeks, roots will develop inside the covering.
🔸 Step 5: Cutting and Planting
🔹 Once strong roots form, cut the branch below the new roots.
🔹 Plant it in nutrient-rich soil in a pot or directly in the ground.
🔹 Water lightly and keep in partial shade for the first few days.
3️⃣ Care After Planting
✅ Water regularly but avoid overwatering.
✅ Apply organic compost or banana peel fertilizer for faster growth.
✅ Keep in full sunlight for at least 6 hours daily.
നല്ല നീളത്തിൽ വളരുന്ന കപ്പളത്തിൽ നിന്ന് കപ്പളങ്ങ പറിക്കുന്നത് വളരെ ദുസഹമണ്. എന്നാൽ ചുവട്ടിലെ കപ്പളങ്ങ ഉണ്ടായാലോ. നന്നായിരിക്കും അല്ലേ. ഇത്തരത്തിൽ കപ്പളം അധികം വളരാതെ തന്നെ ചെറിയ കപ്പളത്തിൽ നിന്ന് അധികം കപ്പളങ്ങ ഉണ്ടാക്കുന്ന രീതിയാണ് ഇന്ന് നമ്മൾ പരിചയപ്പെടുന്നത്. വീട്ടിൽ വളർത്തുന്ന കപ്പളത്തിന്റെ മുകൾ തണ്ട് ഒടിഞ്ഞു പോയാൽ ആ ഭാഗത്ത് ഒരു പ്ലാസ്റ്റിക് കവറോ അല്ലെങ്കിൽ മറ്റെന്തെങ്കിലും വച്ചോ മൂടിക്കെട്ടുക.
ചെയ്യുമ്പോൾ ആ മാതൃസസ്യത്തിൽ നിന്ന് തന്നെ മൂന്നാല് ശിഖരങ്ങളായി കപ്പളം മാറും. അപ്പോൾ അധികം പൊക്കം വെക്കാതെ തന്നെ നമ്മൾക്ക് നല്ല കപ്പളങ്ങ ചുവട്ടിൽ നിന്ന് തന്നെ കിട്ടും. മറ്റൊരു രീതിയിൽ കടപ്പളത്തെ മാറ്റി നടാം. ശിഖരങ്ങളായി വരുന്ന കപ്പളത്തിൽ വേര് പിടിപ്പിക്കുന്ന എന്നാണ് ആദ്യത്തെ ധർമ്മം. ഇതിനായി മാതൃ സസ്യത്തിൽ നിന്ന് വളർന്നു വരുന്ന ശിഖരത്തിൽ ഏറ്റവും താഴെ ഭാഗത്തായി തല മൂർച്ചയുള്ള പിച്ചാത്തി ഉപയോഗിച്ച് കട്ട് ചെയ്യുക.
ശിഖരത്തിന്റെ പകുതിവരെ എത്തുന്ന നീളത്തിൽ വേണം മുറിക്കാൻ മുറിച്ച ഭാഗത്തായി ഒരു പ്ലാസ്റ്റിക് ഷീറ്റ് അല്ലെങ്കിൽ ഒരു കമ്പോ കയറ്റി വെക്കണം. തൊലി വിഭാഗം തമ്മിൽ കൂട്ടിമുട്ടാത്ത രീതിയിൽ വേണം കമ്പ് കയറ്റി വയ്ക്കാൻ. പിന്നീട് ചെയ്യേണ്ട കാര്യങ്ങൾ വീഡിയോയിൽ വിശദമായി കാണിച്ചു തരുന്നുണ്ട്. വീഡിയോ മുഴുവനായും നിങ്ങൾ കണ്ടു നോക്കൂ. വീട്ടിൽ പപ്പായ ഉള്ളവർക്ക് ഉപകാരപ്രദമായ അറിവ്. Video credit : ponnappan-in