
ഈ ഒരു സൂത്രം ചെയ്താൽ മതി കിലോ കണക്കിന് പയർ കുലകുത്തി നിറയും! ഇനി എന്നും പയർ പറിച്ചു മടുക്കും!!! | Easy Payar (Long Bean) Farming Tips – High Yield Method
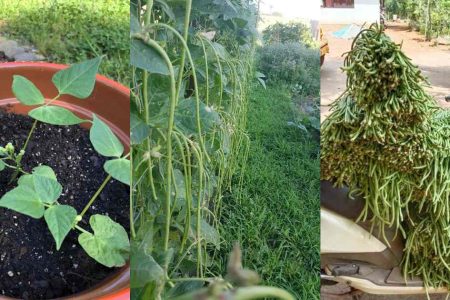
Easy Payar Farming Tips : എല്ലാവർക്കും ഇഷ്ടമുള്ള പയർ നല്ല നാടൻ രീതിയിൽ എങ്ങനെയാണ് നടുന്നതെന്ന് നോക്കാം. അതിന് ആദ്യമായിട്ട് തന്നെ നമ്മുടെ ഗ്രോ ബാഗ് ഒരുക്കണം. മണ്ണൊരുക്കാൻ എടുക്കുന്ന ഗ്രോബാഗിന്റെ ഏറ്റവും അടിഭാഗത്ത് കരിയിലയോ പച്ചിലയോ ഇട്ട ശേഷം നമ്മൾ എടുത്തു വെച്ചിരിക്കുന്നതായ മണ്ണ് നമുക്ക് ഇട്ടു കൊടുത്ത് ഗ്രോബാഗ് ഒരു പകുതിയോളം നിറക്കണം. അതിനുശേഷം നമ്മുടെ വിരലിന്റെ ഒരു വിരൽ വലിപ്പത്തിൽ കുഴിയെടുത്ത് പയർ ഇതിൽ നട്ടുവയ്ക്കാം.
Materials Needed:
✔️ Payar seeds (long bean or cowpea variety)
✔️ Well-draining soil (garden soil + compost + sand)
✔️ Organic fertilizers (cow dung, compost, or neem cake)
✔️ Support sticks or a trellis for climbing
✔️ Watering can
🌱 Step-by-Step Payar Cultivation
1️⃣ Select & Prepare the Soil
- Use a loose, well-draining soil mix (2 parts garden soil + 1 part compost + 1 part sand).
- Add wood ash for extra potassium, which helps in flowering.
2️⃣ Planting the Seeds
- Soak payar seeds in water for 8 hours before planting for faster germination.
- Sow seeds 1 inch deep in rows, keeping 1-foot spacing between each plant.
- Water lightly after planting.
3️⃣ Provide Support for Climbing
- Payar is a climbing plant, so use a stick, trellis, or net for support.
- This helps the plant grow faster and prevents fungal infections.
4️⃣ Watering & Maintenance
- Water every 2 days (keep soil moist but avoid overwatering).
- Use buttermilk or rice water every 15 days for strong growth.
- Apply a thin layer of mulch (coconut husk or dried leaves) to retain moisture.
5️⃣ Organic Fertilization for Better Yield
- Apply cow dung manure or compost every 2 weeks.
- Sprinkle wood ash & banana peel powder once a month for healthy flowering.
- Use neem oil spray to prevent pests naturally.
ഒരു ഗ്രോ ബാഗിൽ മൂന്നോ നാലോ വിത്ത് എന്ന കണക്കിൽ വേണം പയർ ചെടി നടുവാൻ. ഇത് വളർന്നു വരുമ്പോൾ നല്ല ആരോഗ്യമുള്ള 3 തൈ ഒരു ഗ്രോ ബാഗിൽ നിർത്തി ഒന്ന് പറിച്ച് മാറ്റി നടാവുന്നതാണ്. പയർ നട്ടശേഷം ഇതൊന്ന് കിളിർത്ത് വരുവാനായി നമുക്ക് കാത്തിരിക്കാം. രണ്ടോ മൂന്നോ ഇല വരുന്ന സമയത്ത് ഗ്രോ ബാഗിന്റെ മണ്ണ് കൈ ഉപയോഗിച്ചോ മറ്റ് ഉപകരണങ്ങൾ ഉപയോഗിച്ചോ ഒന്ന് ഇളക്കി കൊടുക്കാവുന്നതാണ്.
ഇങ്ങനെ ഇളക്കി കൊടുക്കുന്നത് വായു സഞ്ചാരം വർധിക്കുന്നതിനും വേര് ആഴത്തിൽ പോകുന്നതിനും സഹായിക്കും. മൂന്ന് ഇലയായി കഴിയുമ്പോൾ ഗ്രോബാഗിന്റെ അരികിൽ വീഡിയോയിൽ കാണിച്ചിരിക്കുന്നത് പോലെ മണ്ണ് ഇളക്കി കൊടുക്കാവുന്നതാണ്. ശേഷം ഇതിലേക്ക് ഒരു കപ്പ് ചാണകപ്പൊടി ഇട്ടുകൊടുക്കാം. മറ്റ് വളങ്ങളെ അപേക്ഷിച്ച് ചാണകപ്പൊടിയുടെ അളവ് കൂടുകയാണ് എങ്കിൽ കുഴപ്പം ഒന്നും തന്നെയില്ല.
ശേഷം ഇതിനൊപ്പം തന്നെ കുറച്ച് എല്ലുപൊടി കൂടി ഇട്ടു കൊടുത്ത് ഇതിനു മുകളിലായി വീണ്ടും കുറച്ച് മണ്ണ് ഇട്ടു കൊടുക്കാവുന്നതാണ്. ഒരു കാരണവശാലും വെള്ളം കുത്തി ഒഴിക്കുവാൻ പാടില്ല. കൈകൊണ്ടോ മറ്റോ തളിച്ചു കൊടുക്കുക മാത്രമേ ചെയ്യാവൂ. ഇനി ബാക്കി സ്റ്റെപ്പുകൾ എങ്ങിനെയാണ് ചെയ്യേണ്ടത് എന്ന് വീഡിയോയില് വിശദമായി നിങ്ങൾക്ക് കാണിച്ചു തരുന്നുണ്ട്.ഇതുപോലെ നിങ്ങളും ചെയ്തു നോക്കൂ.. Video credit : Mini’s LifeStyle